The Earthing® Product Tester
Before using the Product Tester, please read the following set up instructions in detail.
HOW TO SET UP THE TESTER
TEP 1: Set Up The Earthing Product Tester
The batteries for the Earthing Product Tester come already installed. Press down on the "PRESS" button on the tester. You should see the green indicator light flash quickly on and off to show the batteries are working.
Check your wall outlet with an Outlet Checker (not included) to ensure you have a grounded outlet. Next, plug the Safety Adapter (included with this kit) into your grounded wall outlet. If you are using a Ground Rod, connect the metal prong of the Safety
Adapter to the end of the Ground Rod cord.
Snap Coil Cord #1 (included with this kit) onto the front of the Product Tester. Plug the other end of Coil Cord #1 into the Safety Adapter.
Snap Coil Cord #2 (included with your Earthing or Ground Therapy product) onto your grounding product. Plug the other end of Coil Cord #2 into the Safety Adapter
Place the tester on to the product, press the PRESS button and the green light will appear.
STEP 2: Test The Conductivity Of Your Earthing Product
DIRECT TESTING: Place the Product Tester firmly onto the conductive surface of your Earthing or Ground Therapy product. Press and hold down the "PRESS" button on the tester. A solid green light in the indicator window shows that your product is conductive and ready to ground you.
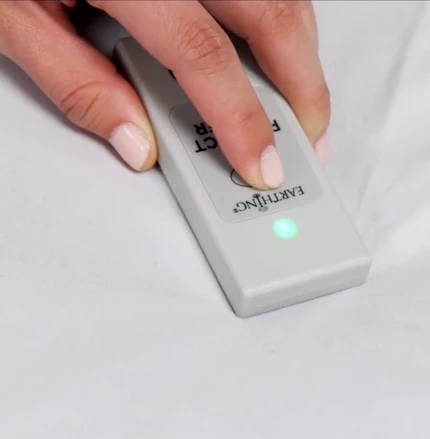
TESTING THROUGH A SHEET: Add a drop of water onto your sheet. As a standard sheet is not conductive on its own, this mimics the moisture from our body's natural perspiration that is created over time and adds conductivity when contact is made with the sheet. Next, firmly place the Product Tester against the area where you placed the drop of water and press and hold down the "PRESS" button. A solid green light in the indicator window shows that your product is conductive and ready to ground you.
A great tip to perform an accurate test is to place either your hand or a solid, flat surface, such as a book, underneath the mat itself to ensure that you can achieve full contact across the sensor plate of the tester and use a decent amount of pressure to mimic our body weight pressing into the bed.
You can also test yourself for grounding when you are in bed using the following steps:
1) Place your plugged-in tester on your nightstand
2) Go to bed wearing only t-shirt and underpants
3) Wait for 5 minutes
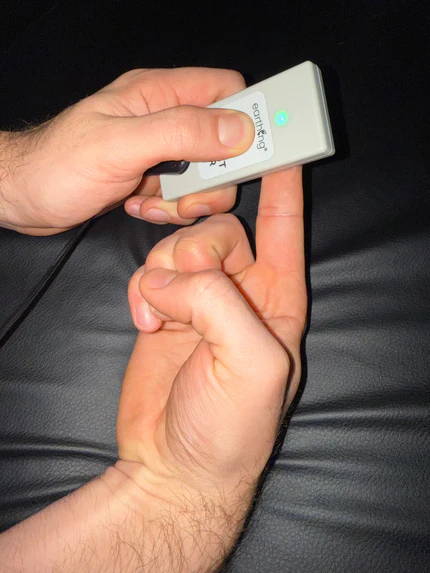
4) After 5 minutes take the tester and ONLY test your index finger
5) If your index finger is testing green your whole body is grounded
PREPARING TO TEST A PRODUCT
1. Check your wall outlet with an Outlet Checker (not included) to ensure you have a grounded outlet.
2. Plug the Safety Adapter (included with this kit) into your grounded wall outlet.
3. Snap Coil Cord #1 (included with this kit) onto the front of the Product Tester.
4. Snap Coil Cord #2 (included with your Earthing or Ground Therapy product) onto your grounding product.
5. Plug the other end of Coil Cord #1 and Coil Cord #2 into the Safety Adapter.
6. Turn the Product Tester on by sliding the green button from the OFF position to the ON position. A green light will quickly flash on and then off in the indicator window to show that it’s ready to use.
You're now ready to test your product either directly on its surface or through one layer of fabric.
TESTING A PRODUCT - TWO METHODS
OPTION 1 = DIRECT TESTING: Place the Product Tester firmly onto the conductive surface of your Earthing or Ground Therapy product. A solid green light in the indicator window shows that your product is conductive and ready to ground you.
If the green light does not turn on, then your product or cord may not be conductive. Please follow the steps listed in the FAQ below, ‘When I test my product, it’s not showing as grounded. What should I do?’
OPTION 2 = TESTING THROUGH A SHEET: Add a drop of water onto your sheet. This mimics the body moisture created over time when contact is made with the sheet. Next, firmly place the Product Tester against the wet area. A solid green light in the indicator window shows that your product is conductive and ready to ground you.
If the green light does not turn on, then your product or cord may not be conductive. Please follow the steps listed in the FAQ below, ‘When I test my product, it’s not showing as grounded. What should I do?’
Turn off the Product Tester and detach the Coil Cord to extend the life of your batteries.
FAQs
Q: When I test my product, it’s not showing as grounded. What should I do?
A: Before you contact our Customer Support Team, please follow these instructions:
1. When you pressed the "Press" button on the Product Tester, did you see the green light flash across the indicator screen? If not, replace the battery (CR2032) and try again.
2. Check that the metal disc on the bottom of the Product Tester is in full contact with the product.
4. Make sure the Coil Cord is tightly snapped to the product and pushed all the way into the Safety Adapter.
5. Move the Product Tester to a new spot on your product. If it lights up in one area and fails to light up in another, there could be wear on your product. Please contact Customer Support to discuss your options.
6. Connect your product to the Safety Adapter with a different Coil Cord (if you have one available) and then test the product again.
If none of the above works, please contact Customer Support.